
HL2DM 102 - Setup and Configuration

Introduction
One of the problems that many players have is that they use a configuration that holds them back. The first objective of this course is to configure the game so that it runs smoothly. The second objective is to help you create a config that allows you to perform at your full potential.
Basic System Requirements
If you are just beginning, you will probably just want to make the most of the hardware you currently have. Once you have been playing a while and develop to certain level of skill, any hardware limitations you have will start to stand out.
Valve's minimum and recommended system specifications for Half-Life 2 are as follows:
Minimum
CPU: 1.2 GHz Processor
Memory: 256MB RAM
Graphics Card: DirectX 7 level
Operating System: Windows 2000/XP/ME/98
Peripherals: Mouse and Keyboard
Other: Internet Connection
Recommended
CPU: 2.4 GHz Processor
Memory: 512MB RAM
Graphics Card: DirectX 9 level
Operating System: Windows 2000/XP
Peripherals: Mouse and Keyboard
Other: Internet Connection
Unless you have an old machine that you cannot afford to replace, you should ignore the minimum requirements. You should also try to exceed the recommended requirements if possible. A slightly faster machine and 1 GB of RAM is preferable.
Graphics Card
The graphics card you are using is a critical factor in how smoothly HL2DM will perform for you. Your graphics card is responsible for rendering everything you see on screen. When talking about graphics, you wil hear the term FPS. In this context, FPS means "Frames Per Second", the number of images that are being rendered per second. If FPS is too low, or drops dramatically within a short period of time, the game will appear choppy. 30 FPS can be considered minimally acceptable. In HL2DM it is preferable not to drop below 60 FPS.
If you want to minimize issues related to rendering, you should get the best graphics card you can afford. While many low end cards will render HL2DM just fine, the actual FPS you get will depend on the complexity of the what is being rendered on screen and the settings you choose in game. If, for example, you have a low end card and run with recommended settings for the card, you may experience sudden drops in FPS during complex renders, such as explosions, fire, water, and dust particles. You can also have level-wide issues if the creator of the level did not optimize the map correctly, or the if it has a lot of complex features. This is not good in-game, because it causes things to get very choppy and makes it easy to lose track of your opponent, or other game entities.
To determine which card you should get, research online and find out which cards are rated highest by reviewers and gamers. For HL2DM, try to get a card with at least 256 MB of on-board memory.
Mouse and Keyboard
Although you can get by with a standard mouse, a gaming grade mouse is highly recommended. Look for one with a laser sensor and at least one extra button located comfotably under the thumb, such as the Razer Copperhead, or the Logitech G5.
Most modern keyboards are fine for HL2DM, just make sure the keys are light to the touch and do not make your hands tired. If you are serious about gaming, or just want better comfort and responsiveness, you may want to get a gaming quality keyboard, such as the Logitech G15.
Internet Connection
A broadband internet connection is practically mandatory if you want to play HL2DM online. Cable is generally faster and more stable for gaming than DSL, but either way you should always verify the upload and download speeds you are getting for your money. Once again, get the best you can afford.
Game Launch Options
When you start up the game from the Steam Games menu, specific starting options can be set in the game properties.
Right click on HL2DM and select "Properties".

Click the "Set launch options" button.

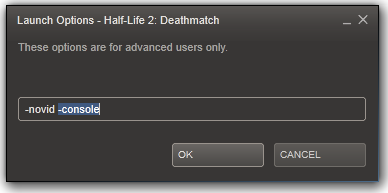
The Launch Options dialog box will display.

There are various options that can be set here. The one shown allows you to start HL2DM without loading the Valve video, making load time slightly faster. Other settings will not be discussed here, but it is useful to be aware of launch options in case you need to set something in there at a later time.
GUI Options
Multiplayer
This is the basic screen where you can enter your in-game name, select a logo that you can spray on surfaces in-game, and select the character you will be seen as. Note that there are several rebel and combine models. If you ever play team deathmatch, it is rebels versus combine. You switch teams here by selecting a model from the other team.

Keyboard
This screen lets you change the keys you use to perform basic functions. Simply highlight the key you wish to change, click the "Edit Key" button and then press the key you want to change it to. If you want to blank out the key, press "Clear Key" instead. To reset all keys back to default setup, press "Use Defaults".

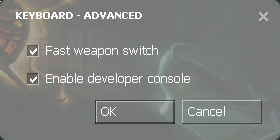
If you press the "Advanced" button you will see the following screen. Check both boxes here. You will learn more about the meaning of both options later in this course.
Mouse
Here you can configure your mouse. The most important item on this screen is sensitivity. For now just choose a setting that feels comfortable. Mouse sensitivity will be dealt with in more depth towards the end of this course. Switch Mouse Filter off. You may choose to use inverted crosshairs if that is your preference by checking the Reverse Mouse checkbox. Inverted means moving the mouse up makes the crosshairs go downwards and moving the mouse down makes the crosshairs go upwards. Disregard the joystick options. A joystick is not recommended for playing this game at an advanced level.

Audio
Here you have sliders to adjust the in-game sounds and background music. Adjust these to your preference. They do not affect game performance, so set them however you wish.
Below that is a drop down to select your speaker configuration. This can affect game performance, because each step higher creates an additional channel which must be processed by your system. If you must have surround sound you can set this accordingly, otherwise select the headphones or 2 speaker option.
The final setting is sound quality. The difference between the three is not significant during play, so the lowest setting is recommended to ensure maximum performance.

Video
Your video settings are the most critical when it comes to game performance. Depending on the setup you have, you will typically need to find the best balance of visual appeal and performance. Performance refers to how smoothly the game is rendered. If your graphics card and system can't keep up, gameplay will appear to be choppy and you will have trouble tracking your opponent and various other aspects of the game.
On the basic screen you can set the resolution and if the game should run in a window or not. Higher resolutions offer greater detail, but cost in game performance. Whatever you choose, you should never go higher than the resolution of your monitor, or parts of the game may be cut off. If you do a lot of multi-tasking, you may choose to run the game in a window, but to minimize the risk of crashing, it is recommended you run the game in full screen mode and run as few other applications as possible. Aspect ratio should generally be set to 4:3 unless you are running the game on a wide screen monitor. Finally, you should click the "Adjust Brightness Levels" button and follow the instructions to ensure you can see three lines of text on screen.

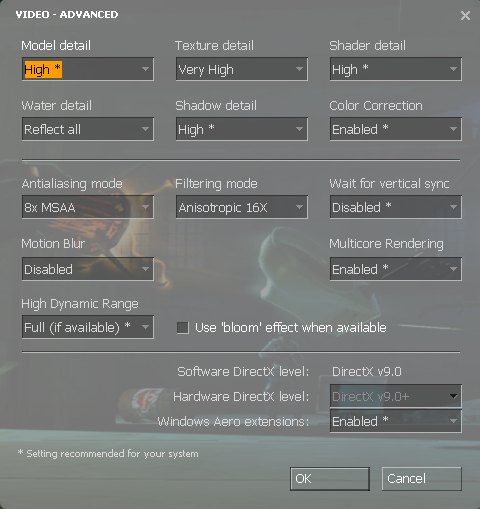
Click the "Advanced" button to view the advanced video settings. These settings give you a great deal of control over how the game looks relative to how it performs. If you have a monster system and state-of-the-art graphics card, you may be able to run with everything on full and not experience a drop in frames at any time. Most people will need to make adjustments to these settings to ensure maximum frames and smooth gameplay.
First notice that some of the values have an asterisk beside them. These represent the recommended default values based on the assessment made by Half-Life 2. If you want to skip this section for now, you may set everything to the recommended values and proceed. Note however that this may not necessarily be optimal for online play. For those interested in getting maximum performance without losing too much in terms of graphics, each of the fields will be discussed below, with recommended settings for online play on a system that meets or slightly exceeds the recommended system requirements.
Model Detail
The model detail setting controls how smoothly objects in the game are rendered, such as other players and props. Medium is offers a good balance of graphics and performance. If you have a low end card you may need to select the Low setting.
Texture Detail
The texture detail setting controls how detailed the textures on the surfaces of the level will look. Textures will look blurry on the Low setting, so Medium is the recommended minimum.
Shader Detail
Shader detail affects performance without making a significant improvement visually. It is recommended this be switched off.
Water Detail
Water detail is another factor that can have a significant impact on performance. Simple reflections are recommended for maximum performance and visibility in-game.
Shadow Detail
This determines how much of a shadow each object casts. Since this is not a necessity in HL2DM, it is recommended this be switched off.
Color Correction
Enabling this setting is supposed to enhance the overall look of the game. It does not affect performance, so set according to taste. Most levels are not optimized for color correction however, so the basic recommendation for HL2DM is to disable it.
Antialiasing Mode
Anti-aliasing (AA) smooths out jagged edges. The actual number of modes available here depend on the card you are running, but you should at least have up to 6x antialiasing available. Before making any changed here, go into the control panel for your graphics card and set any antialiasing options in there to Application Preference ie. allow HL2DM to determine the level. This will give you the flexibility to change it in the GUI as desired and it will also prevent settings conflicts from occurring. 2x AA is the recommended minimum to ensure some smoothing of jagged lines. Like everything else, adjust it based on how good your setup is and the performance you require.
Filtering Mode
This determines the clarity of textures over distance. The higher the filtering level, the clearer the game will look over distance. You can select Bilinear, Trilinear, or Anisotropic Filtering (AF) at 2x, 4x, 8x, or 16x. Just like AA, you should first go into the control panel for your graphics card and set any forced filtering options to Application Preference. Filtering can make quite a difference to how the game looks, so if you can afford it select at least one of the lower AF levels. If you must use a lower setting, Bilinear is recommended as Trilinear reduces performance without making the game look significantly better.
Wait For Vertical Synch
Vertical synch caps your frames per second to the refresh rate of your monitor. To ensure maximum frames at all times, it is recommended this remain off at all times.
High Dynamic Range
High Dynamic Range is an advanced form of lighting, designed to make levels looks more realistically lit and more visually appealing in general. It is recommended that HDR be switched off as not all levels support it and it can reduce performance.
Hardware and Software DirectX Level
The DirectX Levels shown here are informational and cannot be changed through options. The Hardware DirectX Level is a maximum based on the level supported by your graphics card. You can run the game at a DirectX level up to this number. If you have a low-end card, you may decide run at a lower DirectX level to get maximum performance at the cost of visual appeal. How to run the game at a lower DirectX level is beyond the scope of this course, please see HL2DM 203 - Advanced Configuration (coming soon). The Software DirectX Level is a fixed value of 9.0 and this will never change.
Voice
Here you can enable and disable your in-game microphone, plus set the volume. In-game voice does not perform very well. In public servers, most players just use the in-game text chat. In private matches and competition, a third party application is often used, usually Ventrillo or Teamspeak. If you do decide to use your microphone in-game, and the volume is too low with everything on full, you may boost the volume by checking the "Boost Microphone Gain" checkbox.

The HL2DM Console
There is a lot more configuration that can be done in HL2DM that is not available in the GUI. To manage the game fully, a text-based interface called the console is available.
Below is an image of the console. For now do not concern yourself with the text in the console, just know that you can enter commands in the console to configure and manage the game. Note that settings in the GUI can also be set in the console, you just have to know the correct commands.

Enabling the Console
Before you can access the console, it must be enabled. The easiest way to enable it is to use the GUI. You may recall this from earlier:
Step 1: Click Options
Step 2: Click the Keyboard tab
Step 3: Click the "Advanced" button
Step 4: Check the "enable developer's console" checkbox
Now you should be able to toggle the console by pressing the ~ key. Players with a non-US keyboard setup may not be able to locate this key, or the function may not work. If this is the case, for now you may set your console to open upon game launch as described next. Later in this course, a command to bind the toggle to a different key will be shown.
Setting the Console to Open Upon Launch
You can set the console to open when you start HL2DM by adding -console to your launch options.
Using the Console
To use the console simply type in the commands and/or values. As an example, lets use the console to change the mouse sensitivity you set in the GUI. In the console enter:
sensitivity 4
This is known as a "cvar", or command variable. When you set this, either through the GUI or the console, the cvar and value are stored in your configuration file. Even though you could maintain your configuration using just the GUI and the console, there is a more powerful way, and that is to edit your configuration directly using notepad.
Useful Folders and Files
Before learning how to edit your configuration directly, it is helpful to be familiar with the HL2DM file structure. HL2DM is typically installed in the following location:
C:\Program Files\Steam\SteamApps\your_account_name\
The last directory will be the logon name you selected when installing Steam. For example, if your logon name is psycho, the path will be:
C:\Program Files\Steam\SteamApps\psycho\
If you go into this folder you will see folders for all the games installed under that account name. Open the Half-Life 2 Deathmatch folder.
C:\Program Files\Steam\SteamApps\your_account_name\half-life 2 deathmatch\
In here you should see three folders: hl2mp, hl2 and bin. The hl2mp folder is the most useful folder and is the one you will visit most often. It might be useful to create a shortcut to this folder on your desktop.
C:\Program Files\Steam\SteamApps\your_account_name\half-life 2 deathmatch\hl2mp\
The HL2MP Folder
Open the hl2mp folder and look inside. Here are the files and folders you may need to access:
Demos
Half-Life 2 Deathmatch allows you to record demos of your game and then play them back later. The file that is created is placed into the hl2mp folder with the extension .dem. Demo files can be manipulated by going into the hl2mp folder and using windows to rename, move, copy or delete the files.
Configuration Files
You should see a cfg folder in the hl2mp folder. This folder contains the config.cfg file for the game, which stores all your custom settings. You may also create additional .cfg files here that can be executed as desired. Configuration files give you much more control over your setup than just using the GUI and console to manage your settings.
Maps
You should see a maps folder in the hl2mp folder. This is where all the maps that are downloaded from a server are automatically placed. Map files have an extension of .bsp. If you download maps from the internet and want to use them, you will need to copy the .bsp files into this directory.
Logos
To see where logo files are stored in HL2DM, open the materials folder, click VGUI, and then click Logos. Logo files are stored in the Logos folder in a special format that has an extension of .vmt.
Custom Crosshairs
Look for a folder called resource in the hl2mp folder. Inside this folder is a file called halflife2.ttf. This file stores your crosshairs. If you want to replace your crosshairs with a different one, you need to replace this file with the new crosshairs. Note that the filename must match exactly for it work.
Screenshots
Screenshots taken using the in-game screenshot function will be placed in this folder in JPEG format. Check your keyboard options to determine which key is setup to create in-game screenshots.
Sounds
In game sounds can either be packed into a map, or stored separately in this folder. Any in-game sounds that were not packed into the map will download to this location. Any sounds pushed out by server admins will also be placed here.
The Autoexec File
When you change your settings in HL2DM, the new cvar values are written to a file called config.cfg. This is useful because it allows you to manipulate the settings directly by typing them into the config file. It also allows you to share your settings with other players by making a copy of the file and sending it to them.
The only problem is that the game also writes to this file. This means that many cvars managed by the game are mixed in with your custom ones. There is also the possibility that the file could be completely written over or corrupted and your settings lost.
In order to avoid these issues, you can create a separate file called autoexec.cfg that you store all your custom cvars in. This provides a very clean way of separating out your personal settings, making them easier to maintain. It also allows you to delete a corrupted config.cfg and let the game recreate it without losing your settings.
The autoexec.cfg file is not created by default, so if you don't already have one you will need to create it. Before doing so, ensure you can edit file extensions in Windows. Open any folder on your computer and go to the Tools drop-down menu. Select Options and then click the View tab. Look in the list shown for the "Hide extensions for known file types" checkbox and make sure it is unchecked.


Creating an Autoexec File
Go to the hl2mp folder and open up the cfg folder:
C:\Program Files\Steam\SteamApps\your_account_name\half-life 2 deathmatch\hl2mp\cfg\
Create a text file here. Rename it from New Text Document.txt to autoexec.cfg. Even though the file type has changed, you will still use notepad to edit it (right click on it and select Open With -> Notepad).
Now that you have the autoexec.cfg open in notepad, you can add in your custom settings. For now, let's add in the mouse sensitivity cvar as an example. Type into the autoexec.cfg:
sensitivity "4"
You can also put comments in your autoexec if you want to add notes to remind you of what something does, or why it is set the way it is. Anything following double forward slashes is ignored by the game:
// This is a comment in a config file
Save your changes and close the file. Now the mouse sensitivity cvar is permanently set and will be executed each time you start a new level. You can also force the autoexec file to run in the middle of a game by bringing up the console and entering:
exec autoexec
Protecting Your Autoexec File
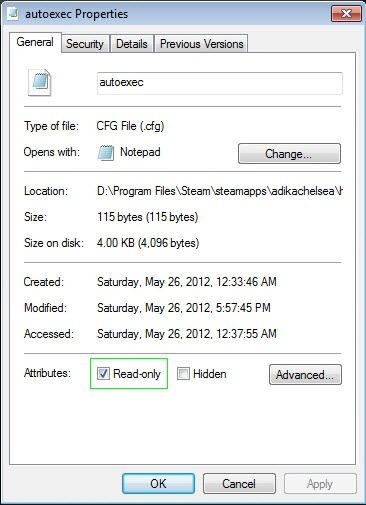
To ensure your settings are never accidentally overwritten you should keep a backup copy of the file elsewhere on your computer, plus you should set the file to read only when you are not editing it. If you need to make adjustments you will need to temporarily change it back to being a writable file. Simply right click on the file and select properties. You can check and uncheck the read-only attribute as necessary.
Configuration Concepts
It is recommended that you maintain your long term settings in your autoexec.cfg and use either the GUI or the console to make temporary changes. By doing this you will always start the game with consistent settings and it wont matter if you forget to change something back at the end of the previous game.
This section will discuss some of the basic factors that should be taken into consideration when creating your config. We will also construct a basic autoexec file that takes these factors into account.
Note that many of these changes will feel like you are going backwards instead of forwards in terms of skill. You may want to make one change at a time and integrate the changes slowly rather than changing everything all at once. In the long run, having a good config will enhance your game significantly.
Note: The following recommendations were written for a keyboard with a QWERTY key layout. If you are using a different keyboard, you will need to translate the keys accordingly.
Movement Configuration
There are seven core movement keys: forward, left strafe, backwards, right strafe, duck, and jump. You should be able to comfortably use each of these in combination with each other. Especially important is the ability to do foward + sprint > jump > duck, which is the foundation of advanced movement.
There are two recommended sets of direction keys. The first is the default set: WASD. The second is touch-typing position: ESDF. Both are suitable for advanced play. Test how comfortable each feels when resting your three middle fingers on forward, left strafe and right strafe, and your little finger and thumb on left shift and spacebar respectively.
Recommendation: If it is comfortable enough, use ESDF for your four direction keys. There is a raised dash on the "F" key that lets you feel home position. It also has more adjacent keys within comfortable reach for binding other commands to.
Although you can stick with the default sprint and duck keys, it can be awkward when trying to move in an advanced manner. The alternative is to move one of these keys to the thumb button on your mouse. This means you have one finger dedicated to each key instead of relying on your little finger to press both.
Recommendation: Put sprint on the thumb button on your mouse and move duck up to the left shift key. If you don't have a mouse with a thumb button, leave sprint and duck in their default locations. Keep jump on the spacebar.
Weapon Configuration
If you have played through Half-Life 2, you may be used to switching weapons by slots (weapon groups accessed by pressing the number keys along the top of the keyboard), or by using the mousewheel to scroll through your weapons. While some players can use these methods and still do well in HL2DM, this is far from optimal. The alternative is to bind each weapon to an individual key for instant access. The method for binding weapons in your autoexec is as follows (replace X with the key you want to use):
 bind "X" "use weapon_physcannon" // Grav-gun
 bind "X" "use weapon_crowbar"
 bind "X" "use weapon_stunstick"
 bind "X" "use weapon_pistol"
 bind "X" "use weapon_357" // Mag
 bind "X" "use weapon_smg1" // Machine gun
 bind "X" "use weapon_ar2" // Combine rifle
 bind "X" "use weapon_shotgun"
 bind "X" "use weapon_crossbow"
 bind "X" "use weapon_rpg"
 bind "X" "use weapon_slam"
 bind "X" "use weapon_frag" // grenade
Try to bind each weapon to a key that is close and easy to access. The best ones are next to the direction keys you are using.
Recommendation: Bind your gravity gun next to your right strafe key and grenades right above it. This will help you grav-nade more efficiently (see HL2DMU 201 - Advanced Techniques). For example, if you are using ESDF for your direction keys, you would add the following binds to your autoexec:
bind "G" "use weapon_physcannon" bind "T" "use weapon_frag"
You can still use some of the slots if you prefer them, but at a minimum you should turn on fast weapon switching. This can be done in the advanced keyboard options, but it is better to add it to your autoexec:
hud_fastswitch "1"
Fastswitch means you do not have to click primary attack an extra time when selecting your weapon using slots. It is best to have this switched on at all times.
Recommendation: For melee (crowbar and stunstick), continue to use a slot. With fastwitch enabled, this gives you instant access to either crowbar or stunstick, depending on whether you are rebel or combine:
bind "X" "slot1"
In addition to weapon switching, there are a few other weapon related cvars that you should set. The first is the weapon you start with when you spawn. Grenade is highly recommended as it is the strongest starting weapon available for offense. Some people prefer gravity gun to deflect incoming object when they first spawn. These are the only two options you should choose. SMG and pistol are suicidal choices against other weapons and will usually assist your opponent by giving away your position while weak.
The second is automatic weapon switching. If this is enabled you will automatically switch to any weapon you pick up that the game deems more powerful than the one you are holding. This is bad because it means you do not have complete control over your weapons. For example, if you are fighting someone at close range and are using the shotgun, then step on the RPG, you may find yourself blowing yourself up with a rocket instead of finishing off your opponent.
The third is last inventory. This brings up the last weapon you were using. Use of this is personal preference. Some people like to use it when switching between weapons, others prefer just go directly to each weapon they require. It is also used in some advanced techniques, so it is useful to have regardless.
The last one is reload. Most good players do not reload very often. You will automatically reload if you empty a clip, and weapons will also reload while not in use. For this reason, placing reload in a close location is not as important as other functions.
cl_defaultweapon "weapon_frag" // Starting weapon grenade cl_autowepswitch "0" // Auto switch off bind "X" "lastinv" // Last weapon used bind "X" "+reload"
Mouse and Crosshair Configuration
Mouse sensitivity will be discussed in detail later in this course. The m_pitch determines if the vertical mouse motion is inverted or not. Set this to personal preference: 0.022 for normal and -0.022 for inverted. The last cvar determines if the information bars around the crosshair show in your HUD. Again this is personal preference, but many players prefer this to be switched off.
sensitivity "4" // Mouse sensitivity m_pitch "0.022" // Non-inverted vertical movement hud_quickinfo "0" // Bars around crosshair off
Miscellaneous Configuration
First, lets ensure the console is always enabled and set to the preferred key (this is where non-US keyboard users can set the console to a different key):
con_enable "1" // Enable console bind "`" "toggleconsole"
Another important function is the "use" key. This is what you press to open doors, activate buttons, recharge health and armor, and various other function determined by the map you are playing. The use function should be placed somewhere where it wont take your fingers off the movement keys. Stopping at a charger is risky and you must be able to react and move away instantly if caught using one. If you have extra buttons on your mouse, you can place it there, otherwise a key you can reach with the little finger on your keyboard hand should be used.
bind "X" "+use"
Many players do not use suit zoom very much, but you may like to use it, and it can be used to perform the mag sniping technique. How useful this is depends on how good you get at it. If you choose to use it, you should bind it in a place where you can zoom and strafe at the same time. Just like use, it should go either on the mouse or on a button that can be held by the little finger on your keyboard hand.
bind "X" "+suitzoom"
Lastly, you can move the scoreboard toggle to lower priority location so that the TAB key is free to use for something more important, such as a weapon bind.
bind "X" "+showscores" // Scoreboard
A Note on Scripts
If you are not already aware, it is possible to add scripts into your configuration to automate various aspects of the game. A common example is the duck-jump script, which binds duck and jump to one key. It is preferable not to use scripts for the following reasons.
1. Scripts are illegal in most leagues and tournaments.
2. With automation you lose control. Most advanced players find scripts to be more of a hindrance than a help.
3. If you get good at the game you will get called a scripter, exploiter, hacker etc. Despite the fact that scripting does not help as much as many players think, it is nice to be able to answer such accusations by honestly saying you are script-free.
Like many aspects of this game, it is just a matter of opinion whether it is cheating or not. Advocates will argue that everyone has access to it and it is built into the game. Critics will say it is either cheap, or is blatant cheating. In reality, scripts are usually a poor substitute for real ability and you shouldn't even worry about whether someone scripts or not. Once you get better at the game you will realize that most scripts are worthless and wont save someone from losing to a strong player. Anyone accusing you of scripting when you perform advanced moves are probably not aware of what can be achieved with a little knowledge and practise.
Recommendation: Do not bind more than one command to a single key.
A Sample Config
This configuration file is a very basic example of the essential binds and settings you should have in your autoexec file. For a more advanced configuration and the official HL2DMU config, please see HL2DM 203 - Advanced Configuration (coming soon).
Note that this basic configuration is an example only. You may have additional buttons on your mouse, giving you greater flexibility, or you may need to adjust for a standard desktop mouse. Set everything up in a manner that is comfortable for you while still adhering to the principles discussed in the previous section.
// Movement bind "e" "+forward" bind "s" "+moveleft" bind "f" "+moveright" bind "d" "+back" bind "SHIFT" "+duck" bind "MOUSE4" "+speed" bind "SPACE" "+jump" // Weapons bind "MOUSE1" "+attack" // Primary fire bind "MOUSE2" "+attack2" // Secondary fire bind "g" "use weapon_physcannon" bind "t" "use weapon_frag" bind "c" "use weapon_crossbow" bind "v" "use weapon_357" bind "r" "use weapon_shotgun" bind "q" "use weapon_rpg" bind "b" "use weapon_slam" bind "MWHEELUP" "use weapon_ar2" bind "MWHEELDOWN" "use weapon_smg1" bind "1" "use weapon_pistol" bind "w" "slot1" // Crowbar or Stunstick bind "TAB" "lastinv" bind "5" "+reload" cl_defaultweapon "weapon_frag" // Starting weapon cl_autowepswitch "0" // Auto switch off hud_fastswitch "1" // Fastswitch On // Mouse and Crosshairs sensitivity "4" // Mouse sensitivity m_pitch "0.022" // Non-inverted vertical movement hud_quickinfo "0" // Bars around crosshair off // Misc bind "MOUSE3" "+use" bind "a" "+suitzoom" bind "KP_ENTER" "+showscores" // Scoreboard
Optimal Mouse Sensitivity
When you choose a mouse sensitivity, be aware that there is a tradeoff between aim and movement. If you set your sensitivity low, your aim will generally be stronger, but your movement will suffer. High sensitivity will typically result in better movement, but cost you in terms of aim.
There are a few factors that contribute to mouse sensitivity. First of all, operating system mouse speed makes a difference. Set your mouse pointer to a comfortable speed for your computer and make a note of the setting (such as a screenshot) in case it gets changed later and you want to replicate your exact sensitivity. Second, an advanced mouse will allow you to increase the DPI (Dots Per Inch) that the mouse can read. Higher DPI means greater accuracy, but also makes the mouse more sensitive, which you will need to adjust for. Again, make a note of the setting for future reference.
Recommendation: Set your mouse DPI as high as it will go for maximum accuracy, then adjust the in-game sensitivity down accordingly.
Once you have set your sensitivity outside of the game, it is time to experiment with the in-game sensitivity to find your optimal balance of aim and movement. A good measure is the ability to turn 180 degrees in one mouse motion. Use something as a target behind you and practise turning with one motion and shooting the target.
It is difficult to compare sensitivity with someone else because of all the factors that go into the final value. A player with a higher value in-game may in actuality have a lower real sensitivity because their operating system mouse speed is set lower and/or their mouse DPI is much lower.
A standardized test of real sensitivity is to see how many 360 degree turns you do in game when you roll your mouse from one side to the other of a 10-inch wide mousepad. One rotation is too low, because it means you have to cover half the mouse pad to make a 180 degree turn. Anything above 6 rotations is probably too high, as your aim will get very twitchy. Experiment and try to find a balance that suits you. You may need to make adjustments at a later time. As your aim and movement improve, your preferred sensitivity will change as well.


